Example workflow
The retrieval of input files and running the workflow locally and on a server cluster via a queuing system is demonstrated using an example with data available from SRA via NCBI. The dataset is available under the GEO accession number GSE66929. The retrieval of the data is described in this tutorial.
Note
Ensure that you are in the uORF-Tools conda environment as explained in the installation section.
Setup
First of all, we start by creating the project directory and changing to it.
mkdir tutorial; cd tutorial;
We then download the lastest version of the uORF-Tools into the newly created project folder and unpack it.
wget https://github.com/anibunny12/uORF-Tools/archive/1.0.1.tar.gz
tar -xzf 1.0.1.tar.gz; mv uORF-Tools-1.0.1 uORF-Tools; rm 1.0.1.tar.gz;
Retrieve and prepare input files
Before starting the workflow, we have to acquire and prepare several input files. These files are the annotation file, the genome file, the fastq files, the configuration file and the sample sheet.
Annotation and genome files
First, we want to retrieve the annotation file and the genome file. In this case we can find both on the GENCODE [HFG+12] webpage for the human genome.
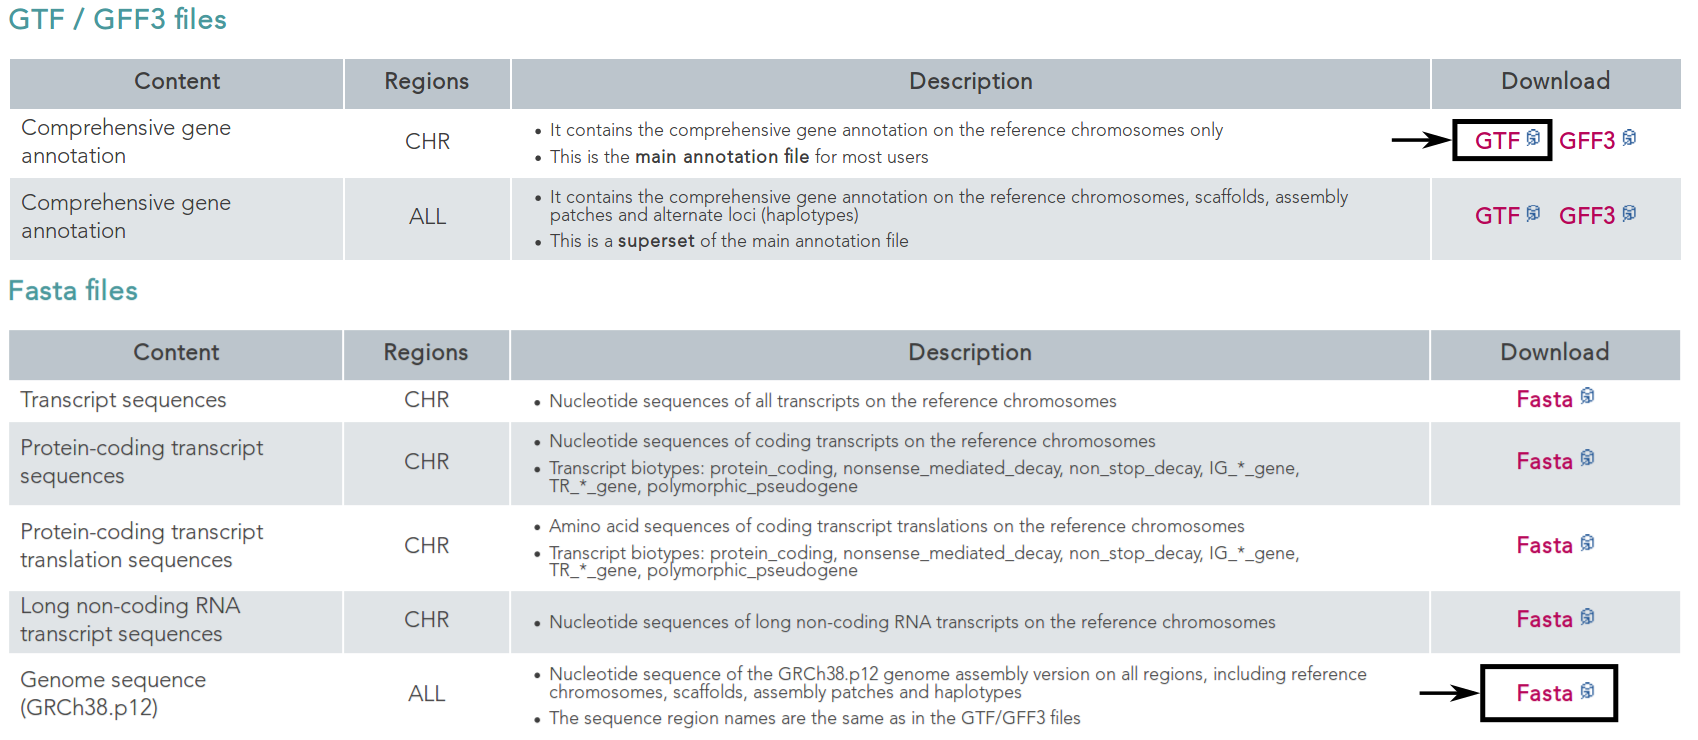
On this page, we can directly retrieve both files by clicking on the according download links next to the file descriptions. Alternatively, you can directly download them using the following commands:
wget ftp://ftp.ebi.ac.uk/pub/databases/gencode/Gencode_human/release_28/gencode.v28.annotation.gtf.gz
wget ftp://ftp.ebi.ac.uk/pub/databases/gencode/Gencode_human/release_28/GRCh38.p12.genome.fa.gz
Then, we are going to unpack both files.
gunzip gencode.v28.annotation.gtf.gz
gunzip GRCh38.p12.genome.fa.gz
Finally, we will rename these files to annotation.gtf and genome.fa.
mv gencode.v28.annotation.gtf annotation.gtf
mv GRCh38.p12.genome.fa genome.fa
Another webpage that provides these files is Ensembl Genomes [ZAA+18]. This usually requires searching their file system in order to find the wanted files. For this tutorial, we recommend to stick to GenCode instead.
Fastq files
Next, we want to acquire the fastq files. For many datasets, the easiest way to retrieve the fastq files is using the European Nucleotide Archive (ENA) [SAA+17] as it provides direct download links when searching for a dataset. Unfortunately, the GSE66929 dataset is not provided by ENA.
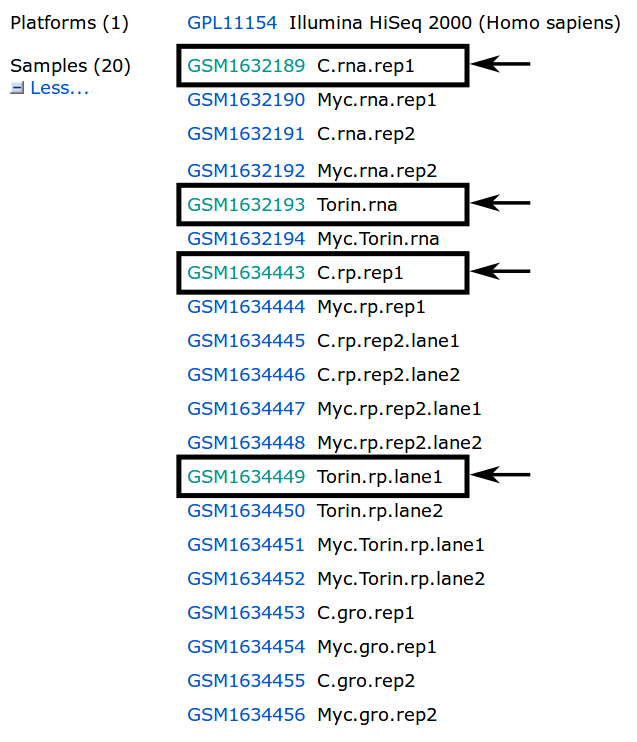
Therefore, we will use the Sequence Read Archive (SRA) [LSS11] instead, which is hosted by NCBI. On the NCBI webpage, we search for the GEO accession number, here GSE66929.

We receive one search result.

When following the link provided in the search results, we get an overview with all kinds of information about the dataset. We are interested mainly in the samples provided on this page. In this tutorial, we are interested in the highlighted samples.
There are many ways to download fastq files with SRA. For more information about downloading please have a look at the following guide: Downloading SRA data using command line utilities.
The simplest way is most likely the usage of the SRA Toolkit, as it allows direct conversion into .fastq files. The figure below shows how to find the SRR ID for the example of C.rna.rep1. By following the GSM ID link (Figure above) and then the SRX ID link, the SRR ID can be retrieved.

Using the SRA Toolkit and the SRR IDs for our 4 samples we can use the fasterq-dump executable to download the according .fastq files.
If you already have an installation of the SRA Toolkit, you can use the following commands.
./<sraToolkitPath>/bin/fasterq-dump SRR1910466
gzip SRR1910466.fastq

./<sraToolkitPath>/bin/fasterq-dump SRR1916542
gzip SRR1916542.fastq

./<sraToolkitPath>/bin/fasterq-dump SRR1910470
gzip SRR1910470.fastq

./<sraToolkitPath>/bin/fasterq-dump SRR1916548
gzip SRR1916548.fastq
If you do not have the SRA Toolkit, we suggest using the conda environment:
conda install sra-tools -c bioconda -c conda-forge
This will install the sra-tools, with all required dependencies, to the current conda environment (uORF-Tools). Then you can use the following commands to generate the required fastq files.
fasterq-dump SRR1910466; gzip SRR1910466.fastq;
fasterq-dump SRR1916542; gzip SRR1916542.fastq;
fasterq-dump SRR1910470; gzip SRR1910470.fastq;
fasterq-dump SRR1916548; gzip SRR1916548.fastq;
Note
Ensure that you compress the fastq files. The workflow expects compressed fastq files and it saves a lot of disk space.
Warning
Be advised that the fastq generation step can take several hours depending on the size of the fastq files and your internet connection.
Now, we create a fastq folder and move all the .fastq.gz files into this folder.
mkdir fastq; mv *.fastq.gz fastq/;
Configuration file and sample sheet
Finally, we will prepare the configuration file (config.yaml) and the sample sheet (samples.tsv). We start by copying templates for both files from the uORF-Tools/templates/ into the uORF-Tools/ folder.
cp uORF-Tools/templates/* uORF-Tools/
Using any text editor (vim, nano, gedit, atom, …), we will first edit the samples.tsv.
vim uORF-Tools/samples.tsv
The template looks as follows:
| method | condition | replicate | fastqFile |
|---|---|---|---|
| RIBO | A | 1 | fastq/FP-ctrl-1-2.fastq.gz |
| RIBO | B | 1 | fastq/FP-treat-1-2.fastq.gz |
| RNA | A | 1 | fastq/Total-ctrl-1-2.fastq.gz |
| RNA | B | 1 | fastq/Total-treat-1-2.fastq.gz |
- method Indicates the method used for this project. RIBO for ribosome profiling or RNA for RNA-seq.
- condition Indicates the applied condition (A, B / CTRL, TREAT). Please ensure that you put the control before the treatment alphabetically (e.g. A: Control B: Treatment or CTRL: Control, TREAT: Treatment)
- replicate ID used to distinguish between the different replicates (e.g. 1,2, …)
- fastqFile Indicates the according fastq file for a given sample.
For this tutorial, the resulting samples.tsv will look as follows:
| method | condition | replicate | fastqFile |
|---|---|---|---|
| RIBO | A | 1 | fastq/SRR1916542.fastq.gz |
| RIBO | B | 1 | fastq/SRR1916548.fastq.gz |
| RNA | A | 1 | fastq/SRR1910466.fastq.gz |
| RNA | B | 1 | fastq/SRR1910470.fastq.gz |
Warning
Please ensure that you do not replace any tabulator symbols with spaces while changing this file.
Next, we are going to set up the config.yaml.
vim uORF-Tools/config.yaml
This file contains the following variables:
- taxonomy Specify the taxonomic group of the used organism in order to ensure the correct removal of reads mapping to ribosomal genes (Eukarya, Bacteria, Archea).
- adapter Specify the adapter sequence to be used. If not set, Trim galore will try to determine it automatically.
- samples The location of the samples sheet created in the previous step.
- genomeindexpath If the STAR genome index was already precomputed, you can specify the path to the files here, in order to avoid recomputation.
- uorfannotationpath If the uORF-file was already precomputed, you can specify the path to the files here, in order to avoid recomputation.
#Taxonomy of the samples to be processed, possible are Eukarya, Bacteria, Archea
taxonomy: "Eukarya"
#Adapter sequence used
adapter: ""
samples: "uORF-Tools/samples.tsv"
genomeindexpath: ""
uorfannotationpath: ""
For this tutorial, we can keep the default values for the config.yaml. The organism analyzed in this tutorial is homo sapiens, therefore we keep the taxonomy at Eukarya. We let Trim galore determine the correct adapter sequence. The path to samples.tsv is correct and we precomputed nothing, therefore we leave the rest empty.
Running the workflow
Now that we have all the required files, we can start running the workflow, either locally or in a cluster environment.
Run the workflow locally
Use the following steps when you plan to execute the workflow on a single server or workstation. Please be aware that some steps of the workflow require a lot of memory, specifically for eukaryotic species.
snakemake --use-conda -s uORF-Tools/Snakefile --configfile uORF-Tools/config.yaml --directory ${PWD} -j 20 --latency-wait 60
Run Snakemake in a cluster environment
Use the following steps if you are executing the workflow via a queuing system. Edit the configuration file cluster.yaml according to your queuing system setup and cluster hardware. The following system call shows the usage with Grid Engine:
snakemake --use-conda -s uORF-Tools/Snakefile --configfile uORF-Tools/config.yaml --directory ${PWD} -j 20 --cluster-config uORF-Tools/cluster.yaml
Example: Run Snakemake in a cluster environment
Warning
Be advised that this is a specific example, the required options may change depending on your system.
We ran the tutorial workflow in a cluster environment, specifically a TORQUE cluster environment. Therefore, we created a bash script torque.sh in our project folder.
vim torque.sh
We proceeded by writing the queueing script:
#!/bin/bash
#PBS -N <ProjectFolder>
#PBS -S /bin/bash
#PBS -q "long"
#PBS -d <PATH/ProjectFolder>
#PBS -l nodes=1:ppn=1
#PBS -o <PATH/ProjectFolder>
#PBS -j oe
cd <PATH/ProjectFolder>
source activate snakemake
snakemake --latency-wait 600 --use-conda -s uORF-Tools/Snakefile --configfile uORF-Tools/config.yaml --directory ${PWD} -j 20 --cluster-config uORF-Tools/torque.yaml --cluster "qsub -N {cluster.jobname} -S /bin/bash -q {cluster.qname} -d <PATH/ProjectFolder> -l {cluster.resources} -o {cluster.logoutputdir} -j oe"
We then simply submitted this job to the cluster:
qsub torque.sh
Using any of the presented methods, this will run the workflow on our dataset and create the desired output files.
Report
Once the workflow has finished, we can request an automatically generated report.html file using the following command:
snakemake --latency-wait 600 --use-conda -s uORF-Tools/Snakefile --configfile uORF-Tools/config.yaml --report report.html
References
| [HFG+12] | J. Harrow, A. Frankish, J. M. Gonzalez, E. Tapanari, M. Diekhans, F. Kokocinski, B. L. Aken, D. Barrell, A. Zadissa, S. Searle, I. Barnes, A. Bignell, V. Boychenko, T. Hunt, M. Kay, G. Mukherjee, J. Rajan, G. Despacio-Reyes, G. Saunders, C. Steward, R. Harte, M. Lin, C. Howald, A. Tanzer, T. Derrien, J. Chrast, N. Walters, S. Balasubramanian, B. Pei, M. Tress, J. M. Rodriguez, I. Ezkurdia, J. van Baren, M. Brent, D. Haussler, M. Kellis, A. Valencia, A. Reymond, M. Gerstein, R. Guigo, and T. J. Hubbard. GENCODE: the reference human genome annotation for The ENCODE Project. Genome Res., 22(9):1760–1774, Sep 2012. |
| [LSS11] | R. Leinonen, H. Sugawara, and M. Shumway. The sequence read archive. Nucleic Acids Res., 39(Database issue):19–21, Jan 2011. |
| [SAA+17] | Nicole Silvester, Blaise Alako, Clara Amid, Ana Cerdeño-Tarrága, Laura Clarke, Iain Cleland, Peter W Harrison, Suran Jayathilaka, Simon Kay, Thomas Keane, and others. The european nucleotide archive in 2017. Nucleic acids research, 46(D1):D36–D40, 2017. |
| [ZAA+18] | Daniel R Zerbino, Premanand Achuthan, Wasiu Akanni, M Ridwan Amode, Daniel Barrell, Jyothish Bhai, Konstantinos Billis, Carla Cummins, Astrid Gall, Carlos García Girón, Laurent Gil, Leo Gordon, Leanne Haggerty, Erin Haskell, Thibaut Hourlier, Osagie G Izuogu, Sophie H Janacek, Thomas Juettemann, Jimmy Kiang To, Matthew R Laird, Ilias Lavidas, Zhicheng Liu, Jane E Loveland, Thomas Maurel, William McLaren, Benjamin Moore, Jonathan Mudge, Daniel N Murphy, Victoria Newman, Michael Nuhn, Denye Ogeh, Chuang Kee Ong, Anne Parker, Mateus Patricio, Harpreet Singh Riat, Helen Schuilenburg, Dan Sheppard, Helen Sparrow, Kieron Taylor, Anja Thormann, Alessandro Vullo, Brandon Walts, Amonida Zadissa, Adam Frankish, Sarah E Hunt, Myrto Kostadima, Nicholas Langridge, Fergal J Martin, Matthieu Muffato, Emily Perry, Magali Ruffier, Dan M Staines, Stephen J Trevanion, Bronwen L Aken, Fiona Cunningham, Andrew Yates, and Paul Flicek. Ensembl 2018. Nucleic Acids Research, 46(D1):D754–D761, 2018. URL: http://dx.doi.org/10.1093/nar/gkx1098, arXiv:/oup/backfile/content_public/journal/nar/46/d1/10.1093_nar_gkx1098/2/gkx1098.pdf, doi:10.1093/nar/gkx1098. |